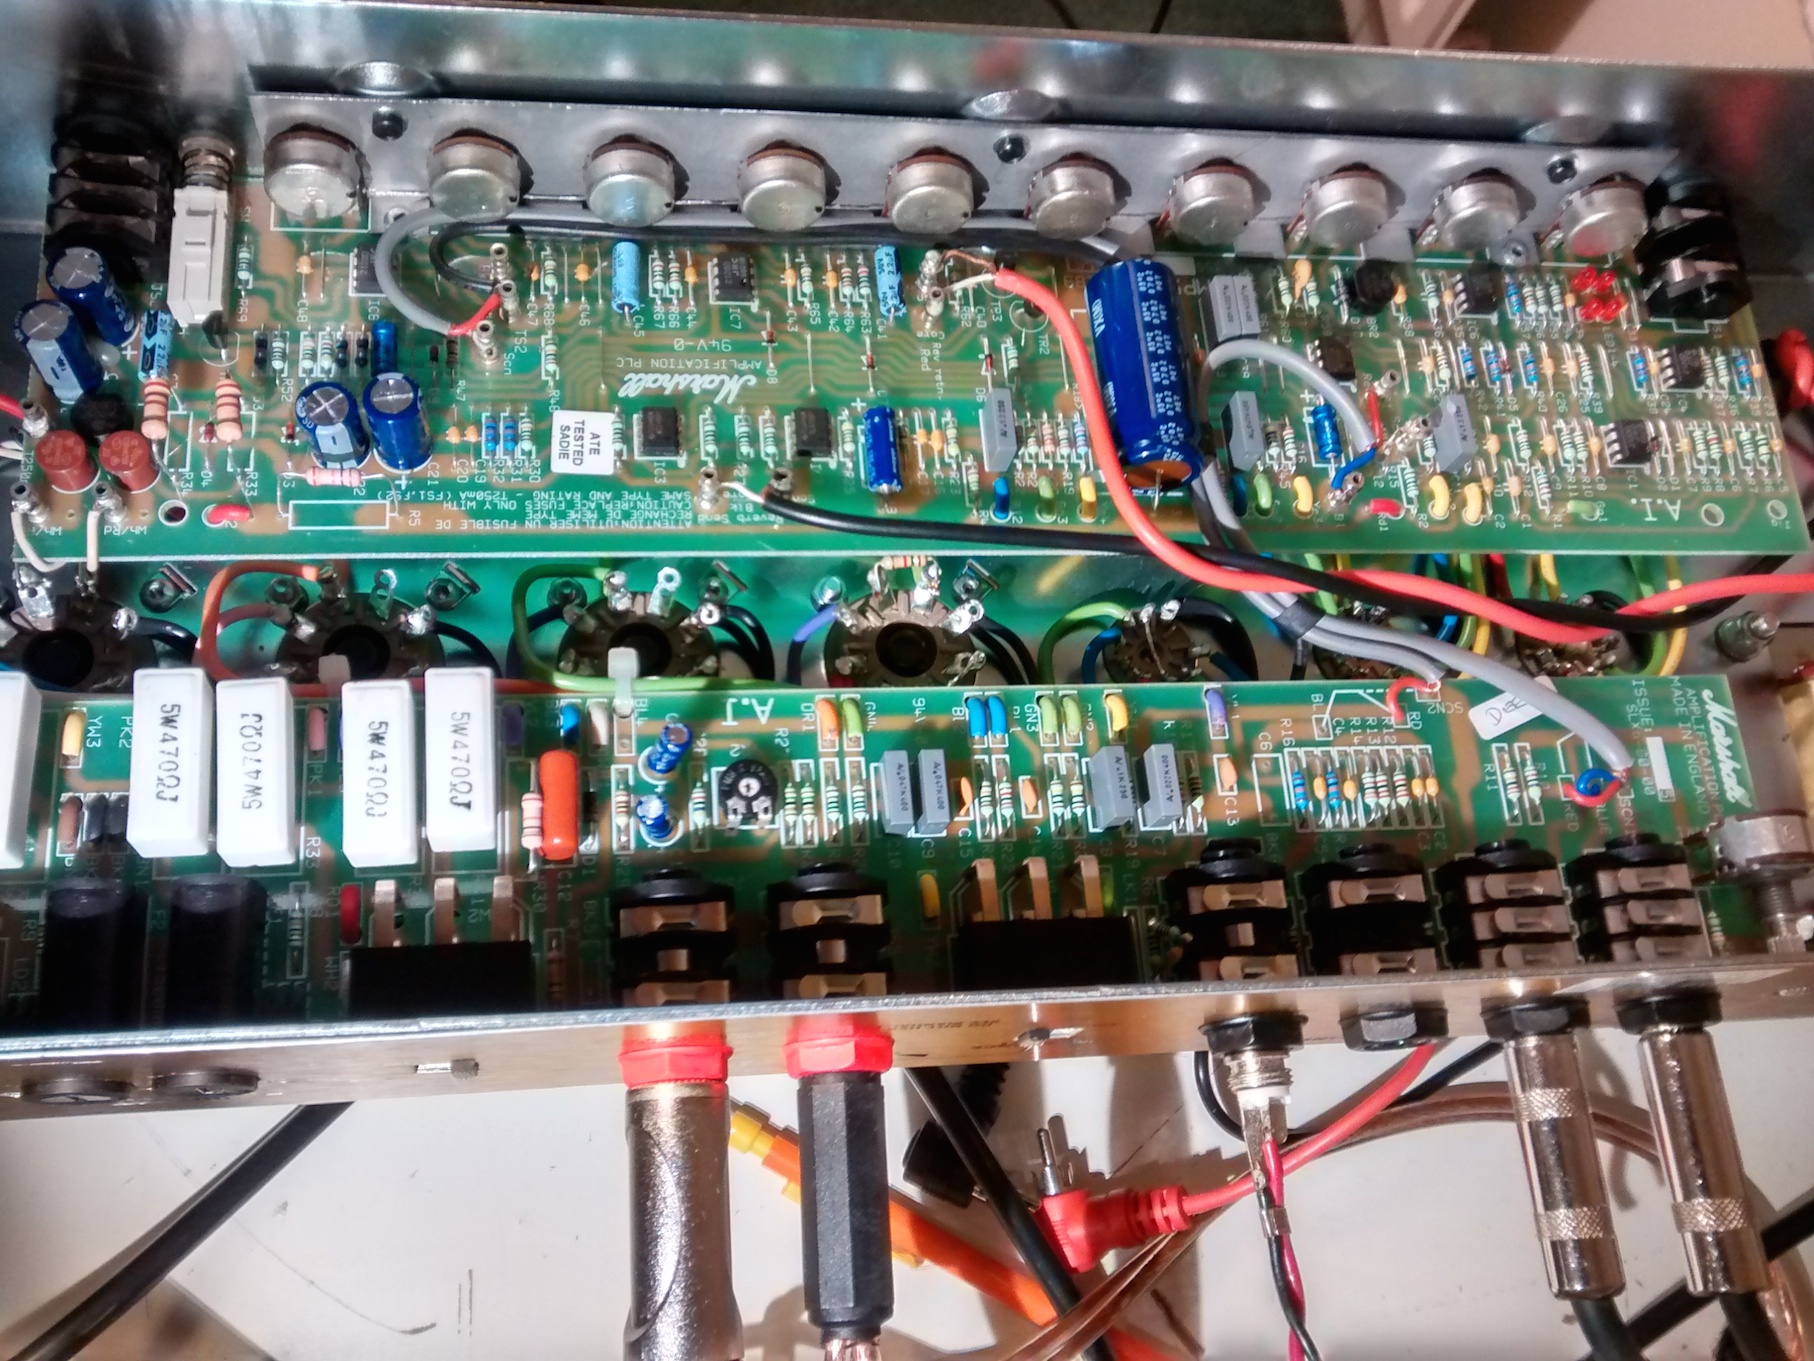
This JCM900 repair arrived after the owner found that it was lacking in volume.
It’s a 2009 unit, two channel, with a 2203 type circuit on channel A and a higher gain circuit on channel B.
The problem appears to have been with the amplifier bias. Although the valves were matched, the bias on this JCM900 repair was set very high. The bias set the dissipation at about 95% – Marshall suggest about 70%. This causes the output to compress much earlier than would otherwise occur. Fortunately this is easy to fix.
I then offered to soak test the amp which is a means of testing the amp in the conditions it would be in rehearsal or gig. This is great for revealing those hard to find problems that would otherwise missed. It revealed a minor fault with the preamp – a crackle appeared behind the note transients. Since this was a relatively minor problem, the owner chose not to have it looked into.
I sometimes have been known to complain that some amp manufacturers give little thought to ease of repair – mesa boogie have had some stick from me in other reports. Some marshall repairs – thinking the DSL range in particular – are a bit difficult because of their complexity but this JCM900 repair is a delight to work on. They’ve really thought things through both in terms of reliability and ease of repair. It’s probably the easiest channel switching amp to repair that I’ve seen.
Although the channel A had a great plexi type tone, the owner isn’t a big fan of the Drive sound in ChannelB – he’s thinking of modding the amp to acheive the fabled Silver Jubilee tone so stay tuned – this one might turn up again.
If you have a JCM900 repair, please do get in touch.
Now, is it good things or bad things that come in threes? It must be good things. This was the third of three vintage vox ac30 repairs that came to me over a few weeks in summer 2015. Vintage amps have a particular smell and when there are 3 vintage vox amps in the workshop for repair you soon become very used to it!
This amp is probably the toughest repair job that I’ve worked on over the last 6 years. Another repair company in Lincolnshire, experienced with vintage amp repairs, had looked at the amp but had ultimately had to give up. I don’t really blame them.
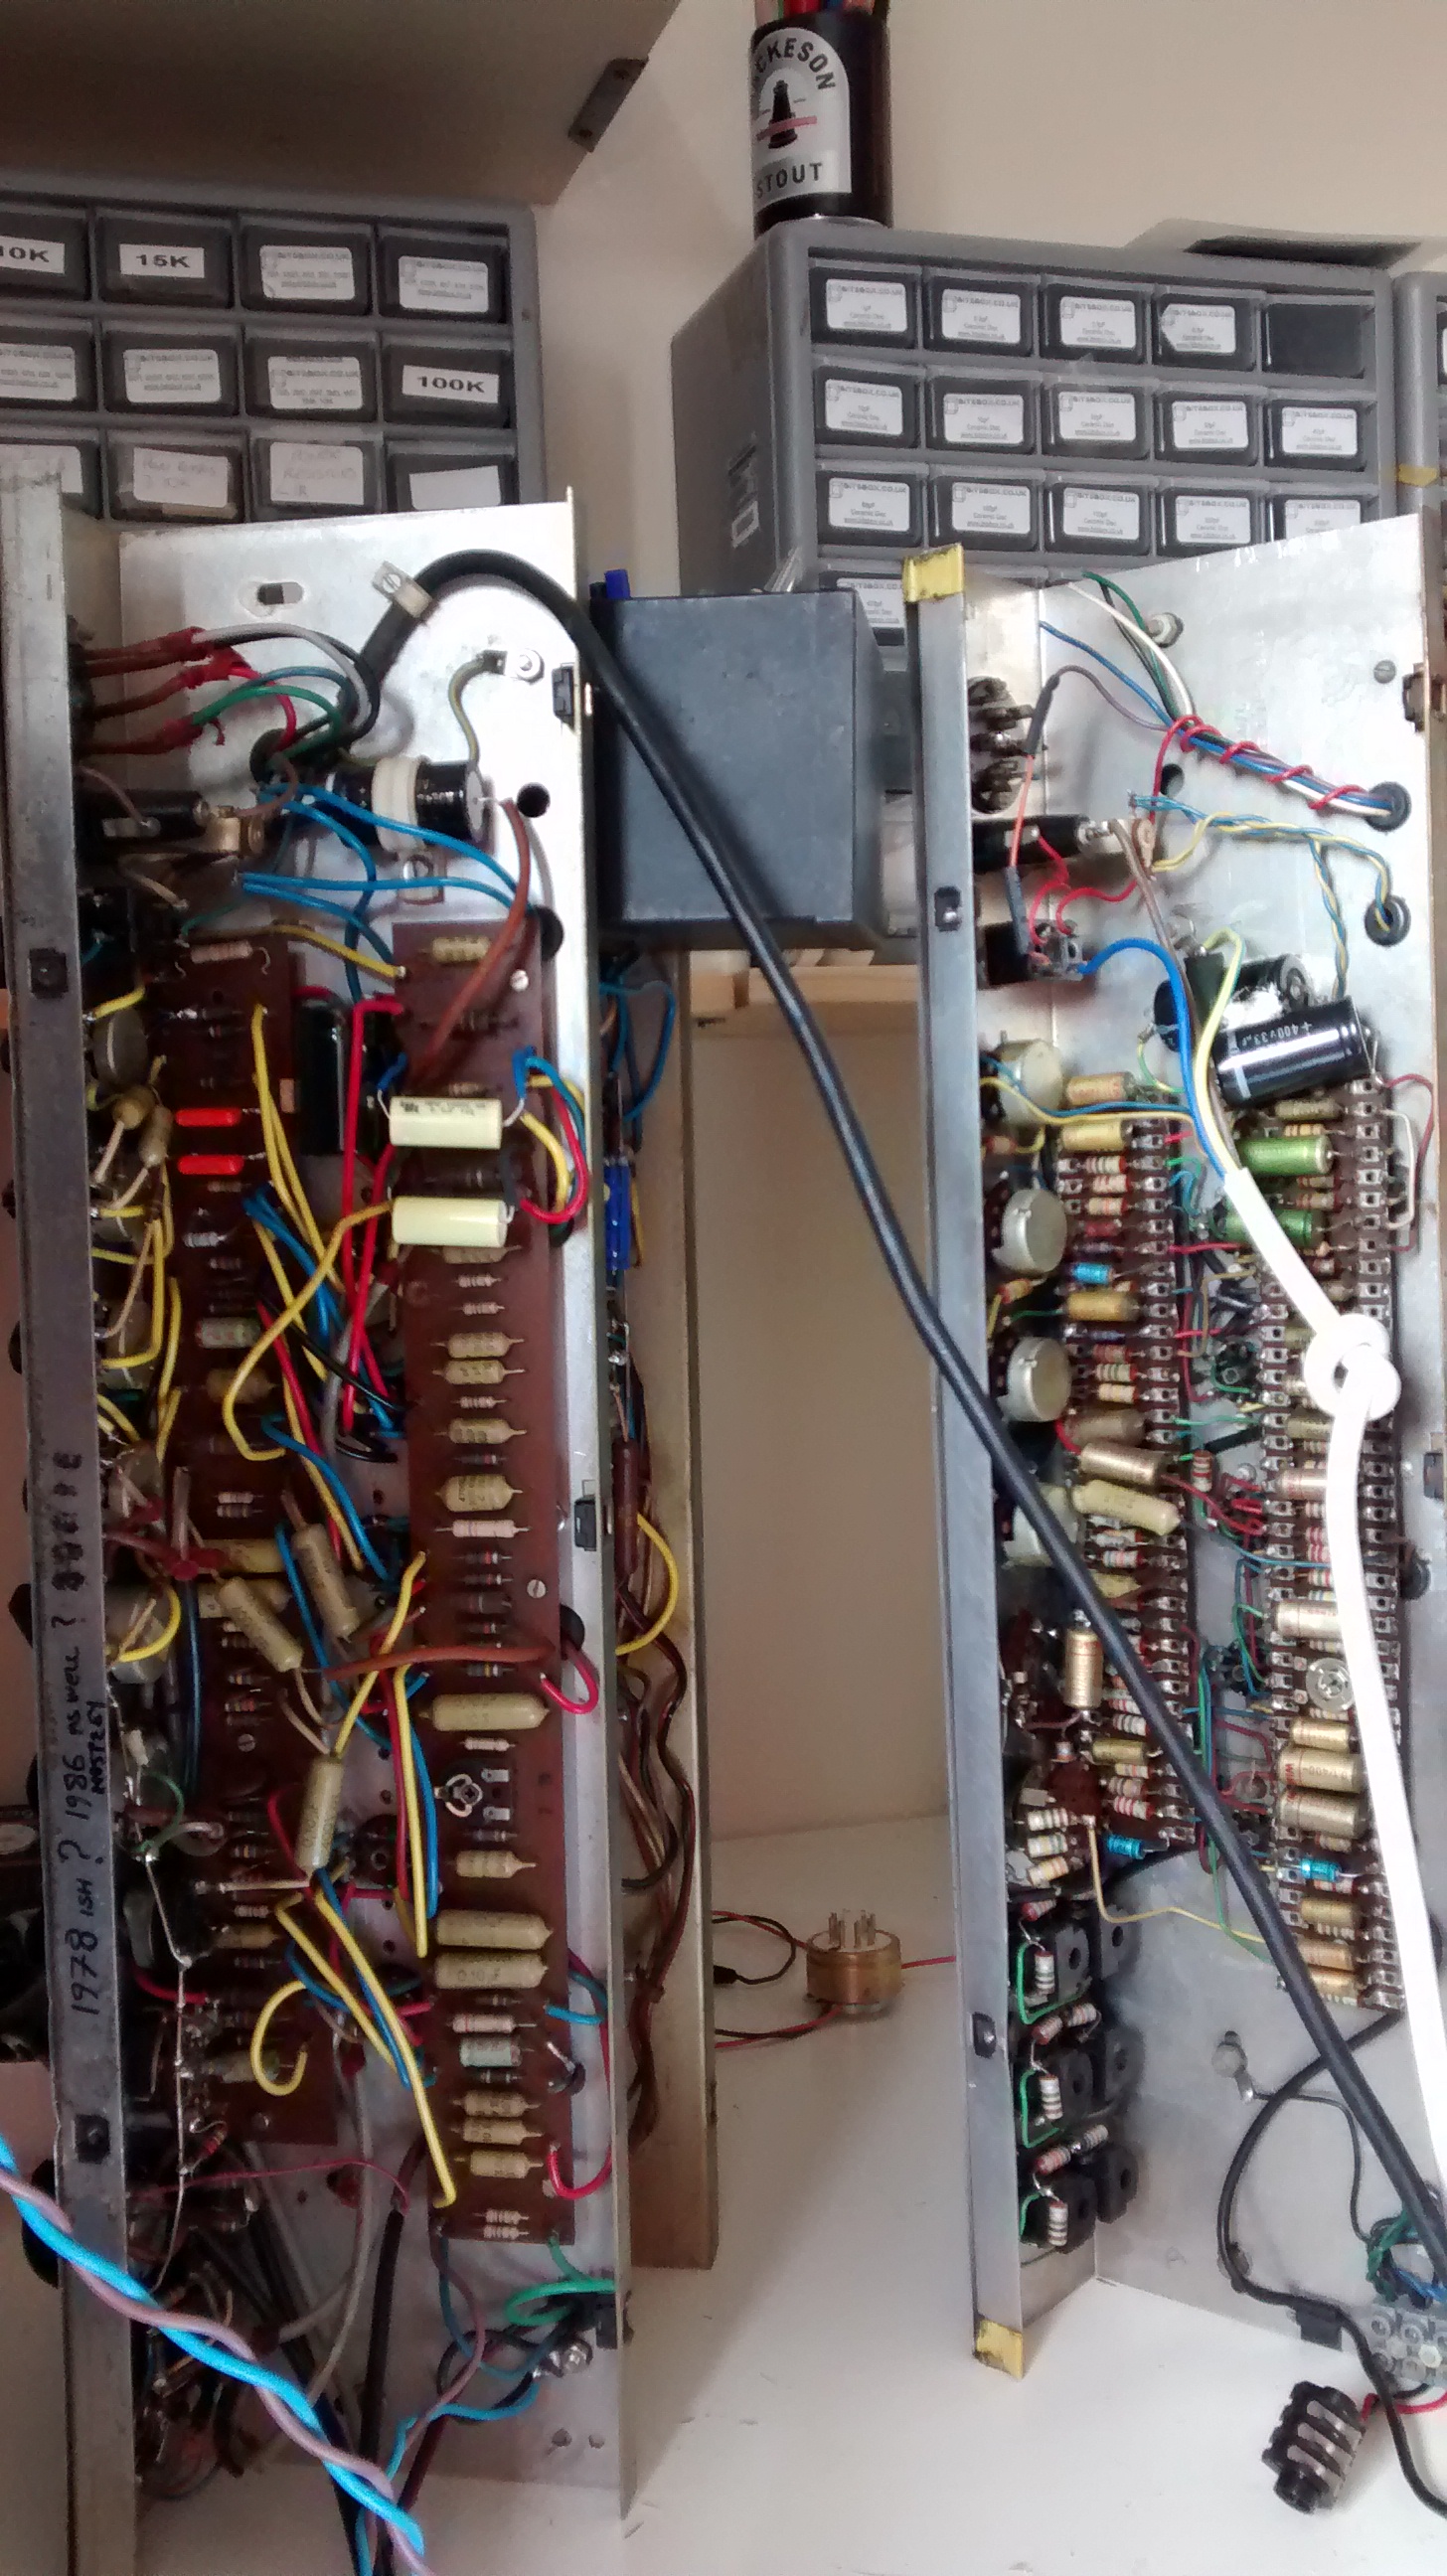
This vintage Vox AC30 (there’s a picture of it on the 1961 vox page too) is I think a 1970s model. I’ve estimated it at 1973, with substantial modifications through the years. However, I’m an electronics geek, not an amp history geek, so I may be wrong. Someone who’s opened up the amp in the past has written “1978 ish ? 1986 as well, mostly ?” inside it. I judge it to be 1973 because the vox logo is a traditional VOX logo as used in the 60’s, but this could have been swapped during it’s lifetime. Early 1970s vintage Vox AC30s used PCBs too. STragely, this doesn’t look like any of the 70’s PCBs that I could find. So, the jury’s out on this one!
Some 70s vintage Vox AC30s came with reverb circuits, but this amp uses a solid state reverb circuit that I can’t find any record of in 70s amps. You can tell that the amp didn’t ever have a valve reverb because it’s a 10 valve unit. The ’78 reverb unit used 11 valves with the extra triode used to buffer the signal into the spring reverb and to make up gain after it. But the amp had a reverb market on the front panel, I assume this must have been fitted later.
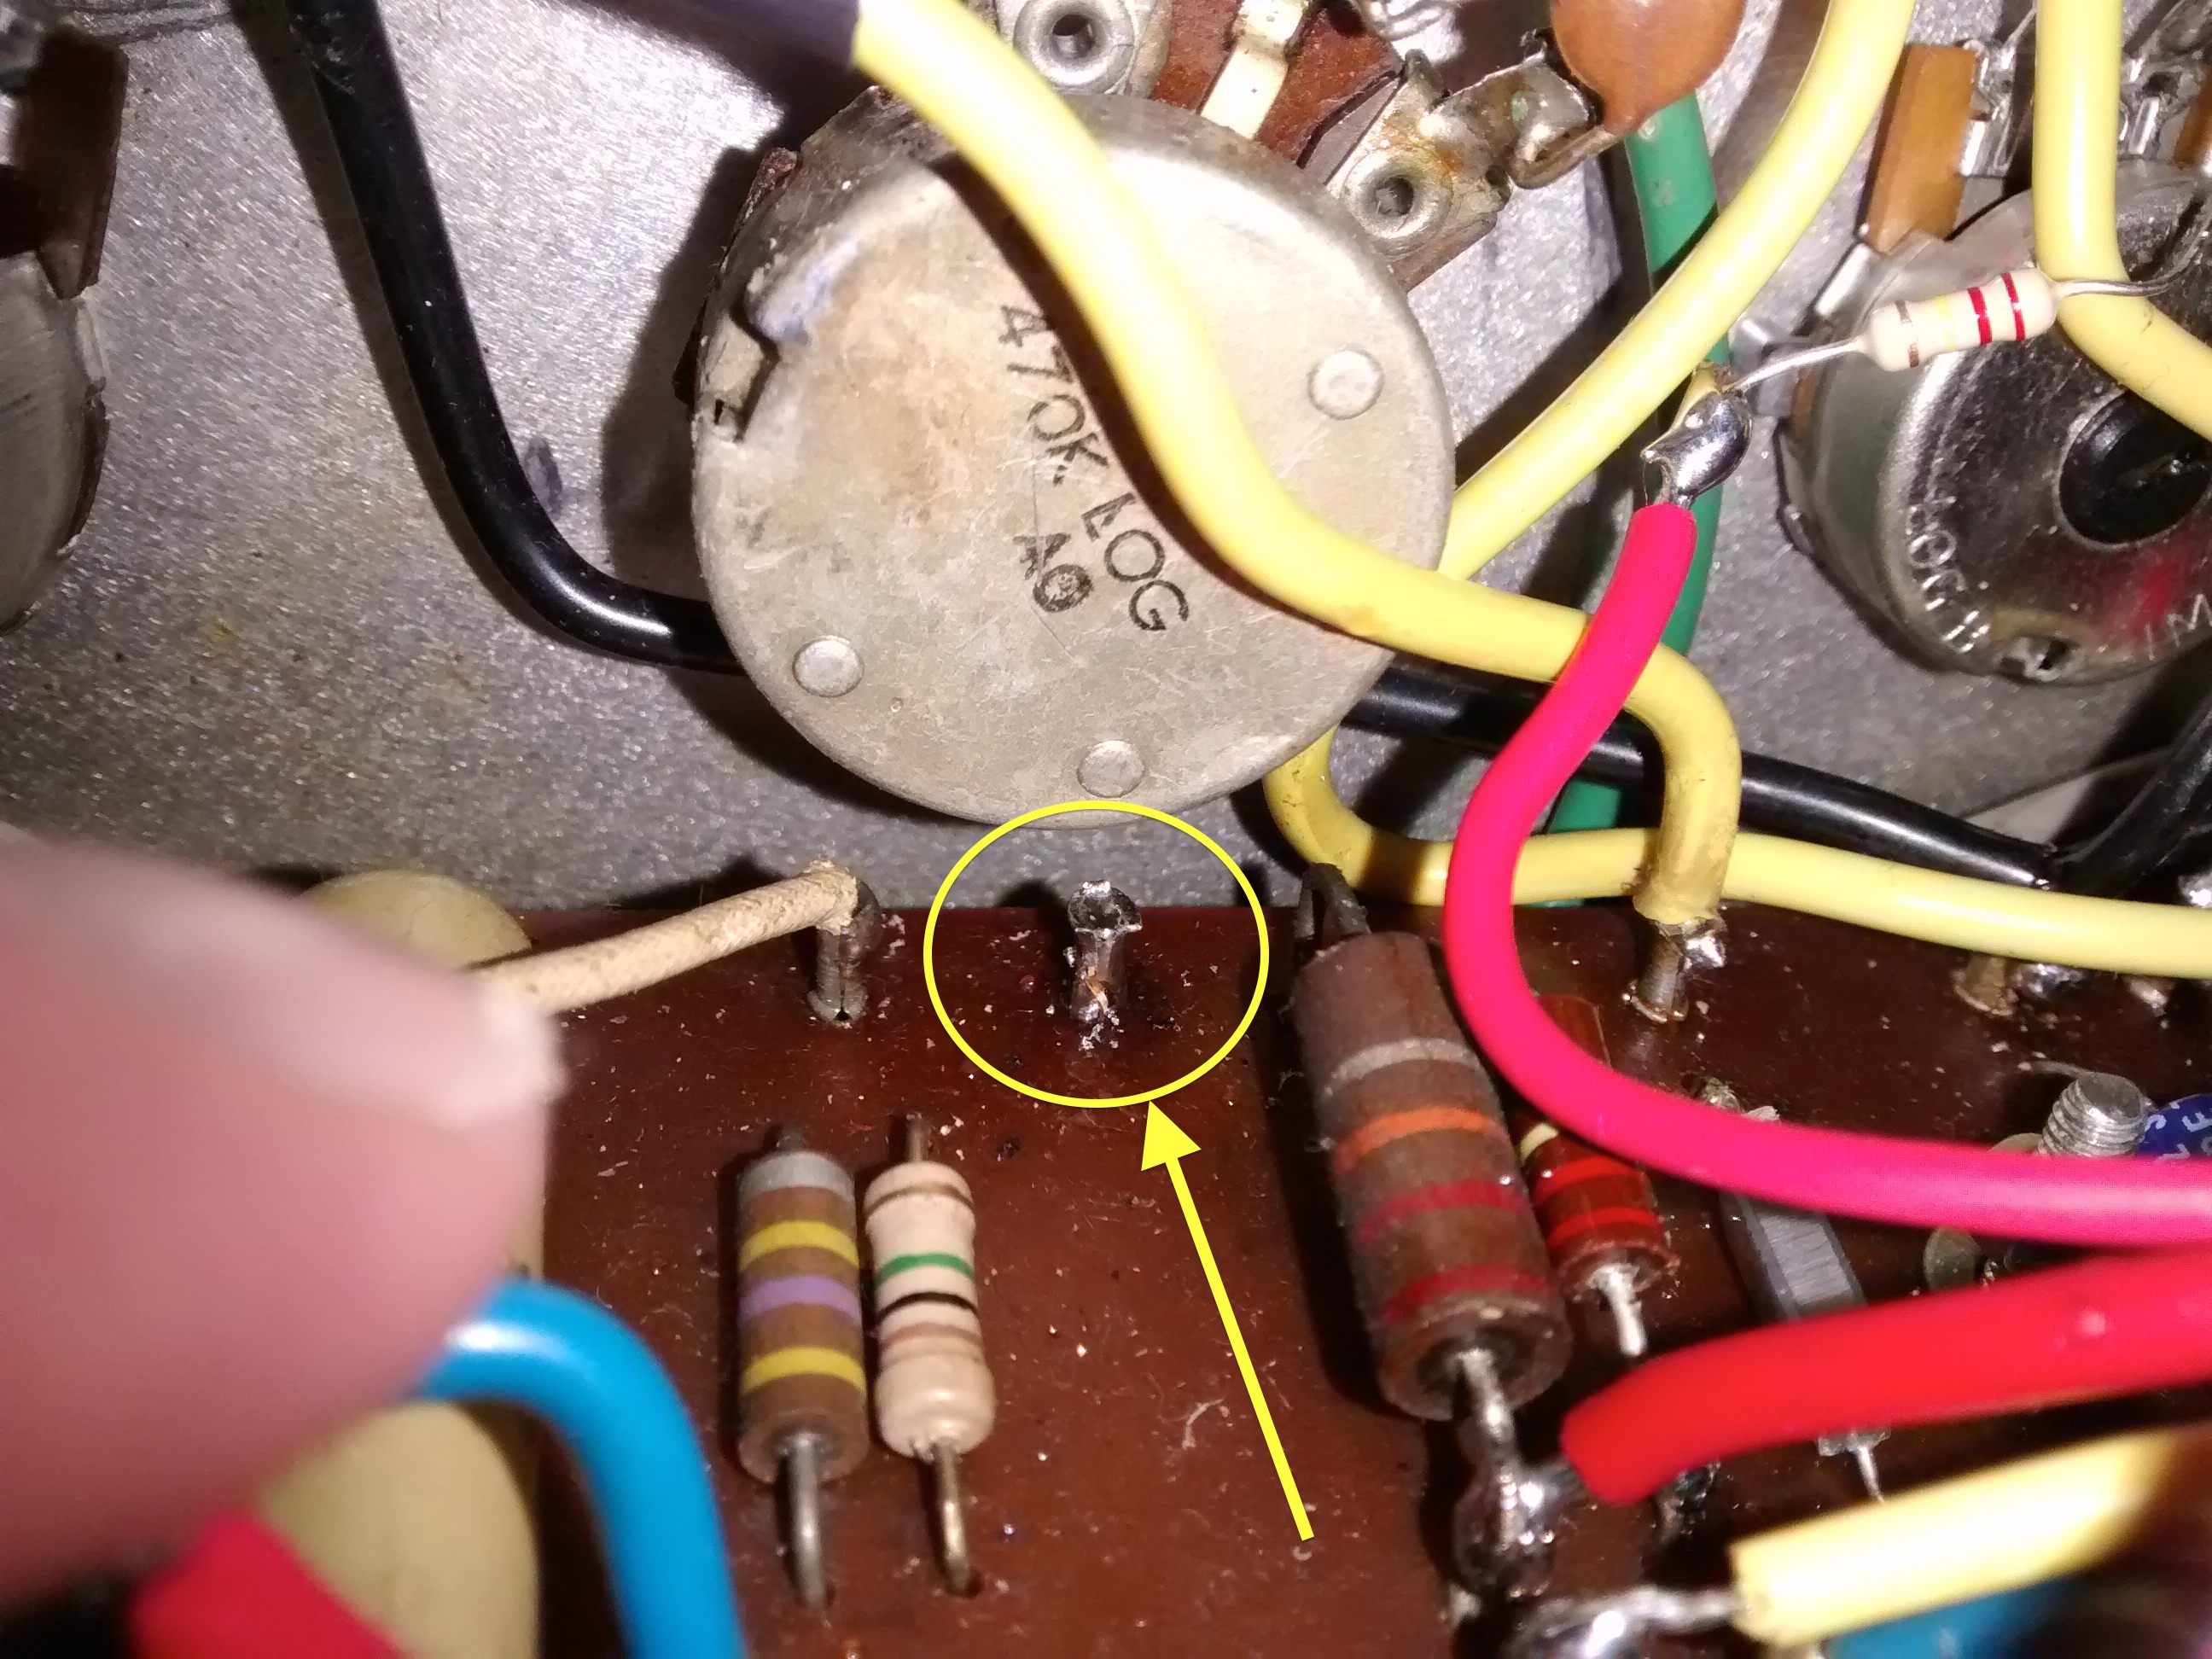
I’ve spoken before of the peculiarities of doing amp repairs on guitar amps and other electronics is that the actual process of repairing can take just 5 minutes, but the fault replication and diagnostic period is often much much longer. This problem is made worse in situations when the problem disappears intermittently. This one would disappear as the amp warmed up, after 20min or so.
The fault turned out to be a loose turret connection between the normal preamp volume control and the phase inverter. The connection appeared to be physically intact with a good solder joint. Grounding the point through the pot appeared to have no effect. However when removing this turret it broke in two. There must have been solder holding the piece together, but not making a reliable connection.
After that was fixed, we decided to wire out the solid state reverb unit and return the unit to vintage AC30 spec by adding back in the LoGain input on the vintage channel. While doing this I noticed that someone who’d worked on the amp, probably whoever fitted the reverb had wired up the input jack wrongly, leaving the brilliant channel jack socket with a high resistance to ground at all times. This turned the unit into a pickup point and the amp was feeding back on its own at high treble settings, with no guitar plugged in. Nightmare! Anyway this was soon fixed.
When finished, this is easily one of the nicest sounding amps I’ve ever played. I love the way the Vintage Vox AC30 circuit distorts. It’s easy to see why it’s become a popular circuit for the likes of Dr Z, Trainwreck, Matchless, Bruno etc. to copy. You can see a bit of it in the quick video I did to celebrate it’s finish!
This vintage vox AC30 repair took a good deal of effort, and I was the second repairer to work on it, bit I’m glad to say that it is now fixed. If b you have a vintage vox AC30 and it’s in need of a bit of TLC, please so contact me via the contact page.
Shortly after the Confetti 1962 vintage ac30 repair arrived, this vintage Vox repair turned up on my bench too! The 1961 in the picture is on the right, the left amp is a 1970’s vintage vox, which you can read about here.
This is (as far as I can tell) a 1961 model. It was once covered in a cream vinyl, but the customer (who had it from new!) had decided at some point that it would look cooler in black and painted it.(!)
After laying down his axe many years ago, the customer decided to sell the amp and brought it to me to service.
I found that the brilliant channel didn’t work. This turned out to be an out of tolerance resistor in the gain stage and a faulty coupling capacitor. Also the tremelo system wasn’t working. In vintage vox circuits, this consists of 6 triodes worth of analog electronics. 2 are an audio input buffer, 2 create a modulating signal and 2 mix the modulation with the audio signal. The fault was with the modulation circuitry and was again down to a worn out capacitor. This is not an uncommon task in vintage Vox repairs.
As with the Confetti 1962 vintage ac30 repair, I hard wired the mains to 245V for UK operation and replaced the ancient power cord with a modern tri rated mains lead.
I’m pleased to say that the customer was very happy with the vintage vox repair! If you have a Vintage ac30, or a vintage amp in need of repair, please get in touch.
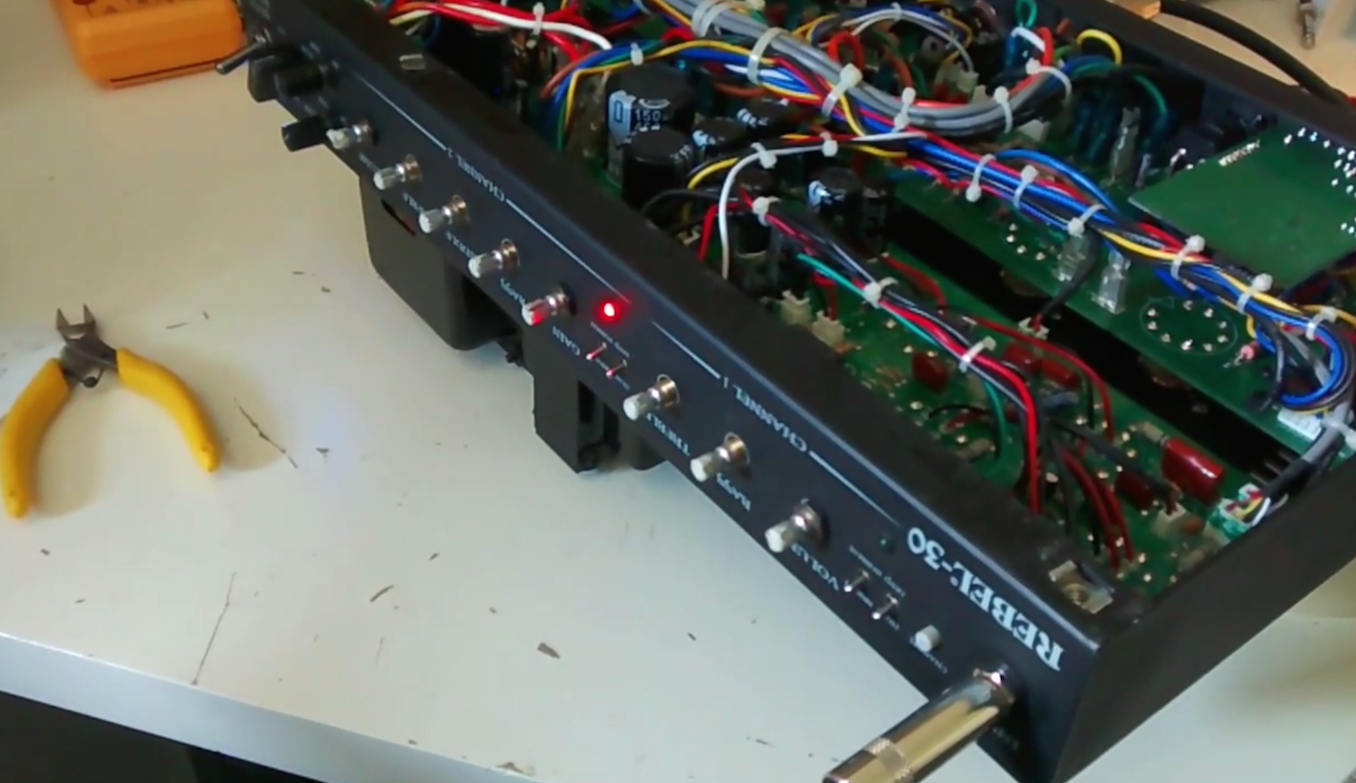
This amp is a Rebel 30 by Egnater. At first, I had a bit of trouble with the Egnater repair but I’m pleased to say that I found a solution for the customer. The diagnosis itself didn’t prove a problem, the problem was simply the gain potentiometer itself. This is a dual ganged part (2 pots in one). One half of the pot behaved fine, the other half was open circuit in the first part of the turn. This caused a loud clunk at the point where the track re-appears (see the video).
There was no maker’s mark on the pot so I couldn’t be sure what brand it was: probably a far eastern part sourced by the contract manufacturers. It’s quite easy to find dual ganged 500K pots from guitar gear suppliers but they’re designed to fit inside guitars or in ’boutique’ hand wired amps – none of them will fit in to the space in this tiny Egnater repair.
Of course I tried to contact Egnater, but received no reply. Unfortunately I wasn’t been able to find an alternative panel mount part that will fit into the space constraints inside the case. There are switches and capacitors internally that would prevent the available chassis mount parts from being suitable.
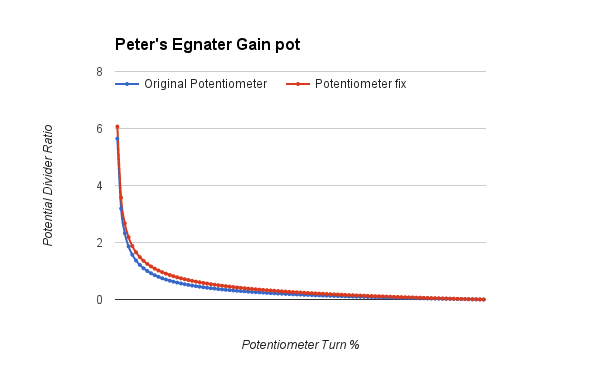
However I came up with a fix that sorts some of the issues with the existing pot. There is still a small bit of silence for the first part of the turn, but the very loud bang is mostly gone, with only a whisper remaining, inaudible unless you’re listening for it. The sound returns whilst the channel is still within the ‘clean’, not yet crunchy part of the drive channel turn, so all the useful elements of the gain channel remain.
Mathematically, the fix I’ve employed affects the potentiometer ratio only very slightly (as in the graph), I’d argue imperceptibly. The truth is it’s probably even closer than the theory suggests, as real pots don’t curve this smoothly! I’ve done a video comparing the tone before and after the mod, to demonstrate that there’s no real difference, but who knows, you may pick up a nuance. As you can hear, the bang is very evident in the video before the mod, but inaudible after.
The video appears here:
I’m pleased to say that the customer was very happy with the Egnater repair! If you have a Rebel 30, or another Egnater in need of repair, please get in touch.
This Blackstar repair was a simple valve amp service before the amplifier was sold. The amp is a series 1-45 2×12 combo. It’s a fantastic 2 channel amp with 4 modes, bright Clean, warm clean, Crunch and Super Crunch.
The amplifier uses Blackstar’s DPR and ISF patents, you can read more about Blackstar’s DPR on my valve amp attenuators page.
The amplifier was performing well, but a test on the valve tester turned up two faulty preamp valves which were replaced. The week before, I’d had another Blackstar amp repair, but as they’re a fairly new brand, I don’t get many Blackstar repairs!
Blackstar amps are one of the many types that I repair, please get in touch if you need my help.
Recently, a Blackstar amp repair was brought to my workshop in Newark. The amp was an HT40 (the Club 40 combo) in working condition, but the owner wanted to try a new set of EL34 power valves in the amp. He selected a matched pair of Tung Sol with slightly higher gain (according to my valve tester) than then outgoing stock Ruby parts.
However, whilst checking the amp over my valve tester highlighted a fault in one of the Sovtek preamp valves, so I’ve replaced this with a JJ ECC83S.
There’s an interesting and fairly unusual element in these Blackstar HT amps – they appear to use a transistor Phase inverter (you can see it in the image at the top), so all the 4 gain stages in the 2 12AX7 preamps are used purely for gain in the preamp circuit. They sound great. This unit doesn’t use the DPR circuit that I mention on that page.
Anyone who knows me as a player, rather than a tech will know I’m a bit of a Blackstar amp fan. I play a Blackstar Series 1 50W head (recently upgraded from a heavy Blackstar Series 1 45 combo). I almost bought one of the these HT40s actually!
If you have a blackstar repair, please get in touch!
Below is an extract from an email conversation with a customer who asked for some impartial advice on a popular ‘mod’. I’ve redacted names, images and product links. I’ve no wish to slander anyone or their products, but I do hope to bring some clarity in a field awash with mis-information. All opinions are my own, if you disagree with something, please do let me know, preferably in a civil manner! Please view this a general piece of advice regarding amp modification, rather than a specific commentary upon this product.
BS stands for ‘bad science’. If you thought otherwise then my apologies, OK? 🙂
Hi Mike,I’ve just commented on the various claims, referencing these photos. There’s a few interesting potential benefits, […] I’ve gone into quite a bit of detail, so I might pop this on my blog so others can find it. 🙂
My modification rule of thumb is that anything that makes less difference than a new set of guitar strings is pointless. I’d say there are two component changes here that may pass that criteria. Firstly, the bias mod will make a noticeable difference, that you may or may not like. If the designer used C7 to shape the amp’s tone, which is likely from the component position, then removing C7 will bring the biggest tonal change to the whole amp. The boutique components are probably BS. 🙁
[image removed, the following italic text is pasted from the seller’s description, my comments are in colour]
CLAIM: Swapping the valves for a full set of new JJ Electronic ECC83S and EL84
AMPWORKS COMMENT: New valves can of course make a difference, you can try this yourself by buying new valves from a reputable supplier (such as me!) Valve changes generally make less difference than a new set of strings. 🙂
CLAIM: The cheap push-on heater connectors were dropping too much voltage between the transformer heater wiring and the V3 heater pins.
COMMENT: Probably BS. It’s feasible that the connector contact resistance may drop voltage and hard wired connections are more reliable, but the sensible approach is to replace only if a valve heater actually stops working (maybe after contact oxidation from storage in a damp garage). This will have no effect upon sound.
CLAIM: The rubbish heater connectors are removed and the valve heater circuit wiring is completely hard wired. Wire dress was particularly poor.
COMMENT: This means that the heater connections (yellow and black in the photo) weren’t tightly twisted at the factory. Heaters can be a source of hum, twisting the wires reduces the magnetic field created by the high current in the wires. If you have a problem with hum (with no guitar plugged in) then this is useful. If no hum problem, no point!
CLAIM: Bias was set too high. Output tube bias is corrected to produce maximum power output.
COMMENT: OK, this is not BS. The tiny terror is cathode biased (meaning it self biases (see my blog page on bias here). But the designers have chosen to set this self bias point quite hot. Because valves are non linear this does make a difference to the sound the amp produces. Whether it’s a change you’ll like is another question. The output stage will be louder and cleaner. You’ll hear the difference more if you play it pretty loud.
CLAIM: Preamp voltages were OK in 15W mode, but a bit on the low side in 7W mode.
COMMENT: Probably BS. This means nothing without context. There’s no such thing as an ‘OK’ or a ‘bad’ preamp voltage, unless the valve is pushed outside of it’s performance limits.
CLAIM: Components were ordinary commercial grade, nothing special. Critical components in the signal path are upgraded to boutique grade items, including:
Mallory 150M Series capacitors, silver mica capacitors
COMMENT: Someday I’ll do a proper scientific comparison of the ’boutique’ cap brands, I’ll try and remember to let you know, I personally suspect that any change will be very VERY subtle. 🙂 What’s MUCH more interesting is that on his photographs he’s actually removed C7 completely. This is likely to have a MUCH MUCH bigger effect than any brand change. C7 is between the guitar input and the first valve. It looks like that cap was originally connected in series so removing it will change the low end response (assuming the frequency corner was previously set to over 80ish Hz).
carbon composition resistors, for a more authentic vintage valve sound.
COMMENT: This is an interesting topic investigated quite thoroughly by RG Keen here. . His conclusions show that there may be some extra distortion created by these resistors that guitarists like. However they have to be used properly, not just replaced as a matter of course. RG recommends that they be replaced every few years as they may become unreliable when used in this way. Carbon comp resistors are generally noisier (hissy) than metal film equivalents.
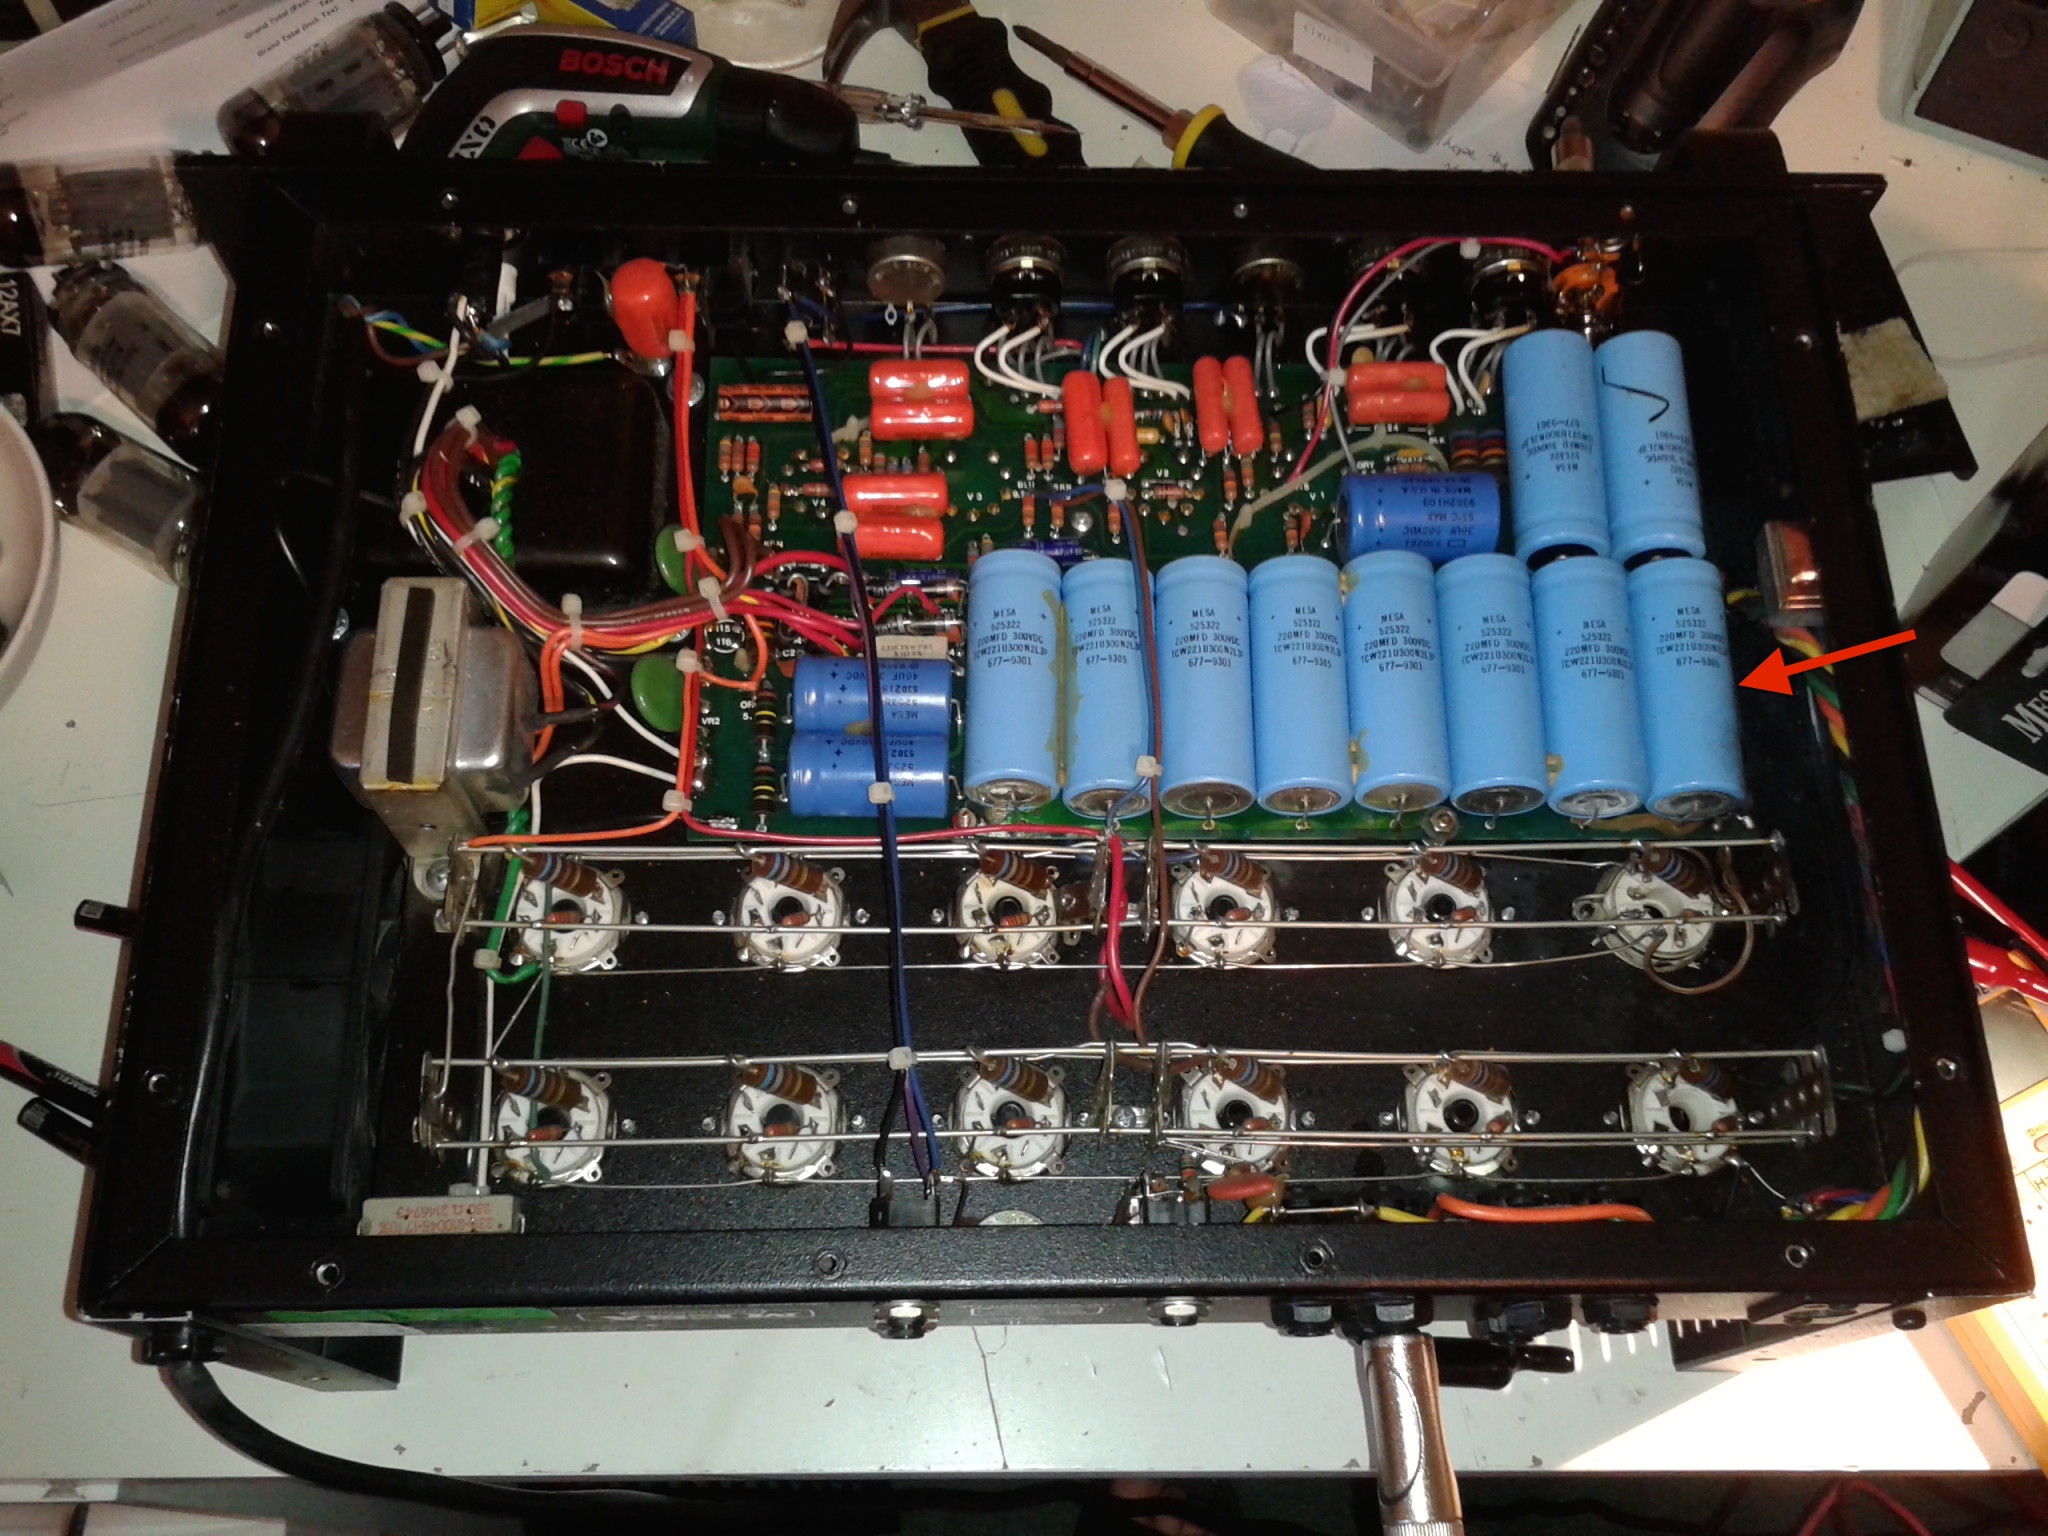
The guys over at Confetti in Nottingham brought me this vintage AC30 repair. It appears to be a 1962 JMI era Vox model but I’m an amp tech, not an amp historian, so I may be mistaken! It’s definitely an AC30/6 model, only made in smooth black vinyl in 1962. It’s very nice!
The customer brought this to me because they were worried about the amplifier getting very hot. I also noticed that the power cord was damaged and that the amp had a ‘Pin’ style voltage selector common in vintage amp repairs. I always recommend that this is wired out if not already.
The power cord has been replaced and the voltage selector wired to 245 (best match for modern UK), so the switch is now a dummy.
The overheating was caused by leaking reservoir caps which were replaced. Electrolytic caps have a lifetime of about 20 years so leaking caps are common in vintage amps. Faulty capacitors can lead to a much higher current draw through the transformer, overheating it, causing the issues we’re seeing. It also ties in with the internal HT being over 100V too low.
I noticed that the tremelo mode switch had come loose and the resistor wires have sheared at the body of the device. They were replaced using vintage style carbon composition resistors for authenticity’s sake. (Do carbon composition resistors make a difference to tone? According to R.G Keen, The jury is still out!). If you have one of these vintage units, make sure that you keep the switch tight to avoid similar problems.
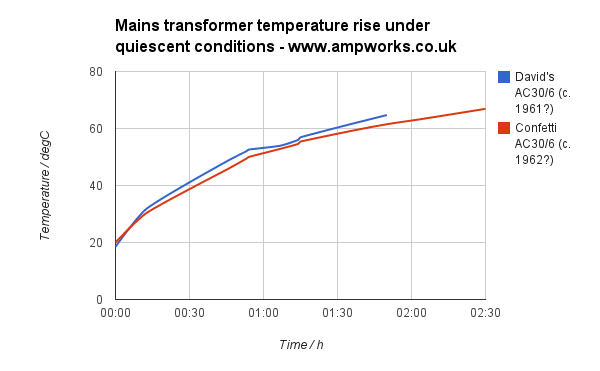
The amp didn’t run especially hot after the caps had been replaced. The output valves are all matched and measure sensibly, and the amp is cathode biased, so there’s little risk of the output stage being out of spec. I had another vintage AC30 repair in (a cream ’61 model), so I was able to make a proper comparison of the running temperature of the two amps. You can see how close they were in the graph above.
I’m pleased to say that the customer was very happy with the vintage AC30 repair! If you have a Vintage vox, or any guitar amp in need of repair, please get in touch.
This mesa boogie bass amp repair had the highest power valve count I’ve seen. The amp uses no less than twelve 5881 6L6 valves!
Like the recent fender amp repair this valve amp was blowing fuses. Also like the fender repair, the failure was down to a damaged power tube. Two in fact.
Much is made of Mesa Boogie’s insistence upon the use of mesa branded valves on guitar forums and these guys come in for quite a lot of stick. You can read Randall Smith’s defence of the idea here. My opinion is that the principle is reasonable for the majority of non technical users.
In this case, the amp had been fitted with Sovtek valves. Aside from the two failures many of the valves no longer matched well.
By testing mesa boogie valves in my valve tester I know what non mesa valves are within mesa parameters for use in their amps. I could tell that 4 of the sovteks were out of spec, meaning that 6 of the 12 needed replacing. After completing this simple task the amp was fixed.
If you have a mesa boogie bass amp repair please contact me via the contact page.
A customer brought this fender repair to me with a common complaint. The valve amp was blowing a fuse every time the standby switch was turned on. A valve amp blowing fuses can be a number of things, but in this case I suspected that the amp probably had a faulty power valve.
This turned out to be true. One of the 6L6 valves had a fault that causes a high current to pass between anode and cathode causing the fuse to blow.
This can occur in all valve amps with all types of valve. Elsewhere on this blog, there’s a Marshall valve amp blowing fuses that was down to a shorting EL34 valve. There’s also a more recent mesa boogie valve amp blowing fuses.
Once a power valve is replaced, it must be rebiased. I set this fender back to manufacturers spec. Matching power valves should always be used.
If you have a valve amp blowing fuses, please do Contact me for advice.