Blackstar Repair – HT40

blackstar-amp-repair

Recently, a Blackstar amp repair was brought to my workshop in Newark. The amp was an HT40 (the Club 40 combo) in working condition, but the owner wanted to try a new set of EL34 power valves in the amp. He selected a matched pair of Tung Sol with slightly higher gain (according to my valve tester) than then outgoing stock Ruby parts.

However, whilst checking the amp over my valve tester highlighted a fault in one of the Sovtek preamp valves, so I’ve replaced this with a JJ ECC83S.

HT-CLUB-40-Repair

There’s an interesting and fairly unusual element in these Blackstar HT amps – they appear to use a transistor Phase inverter (you can see it in the image at the top), so all the 4 gain stages in the 2 12AX7 preamps are used purely for gain in the preamp circuit. They sound great. This unit doesn’t use the DPR circuit that I mention on that page.

Anyone who knows me as a player, rather than a tech will know I’m a bit of a Blackstar amp fan. I play a Blackstar Series 1 50W head (recently upgraded from a heavy Blackstar Series 1 45 combo). I almost bought one of the these HT40s actually!blackstar-valve-amp-bias

If you have a blackstar repair, please get in touch!

Vintage AC30 repair – 1962 Vox repair

1962 Vintage Ac30 Repair

The guys over at Confetti in Nottingham brought me this vintage AC30 repair. It appears to be a 1962 JMI era Vox model but I’m an amp tech, not an amp historian, so I may be mistaken! It’s definitely an AC30/6 model, only made in smooth black vinyl in 1962. It’s very nice!

The customer brought this to me because they were worried about the amplifier getting very hot. I also noticed that the power cord was damaged and that the amp had a ‘Pin’ style voltage selector common in vintage amp repairs. I always recommend that this is wired out if not already.

The power cord has been replaced and the voltage selector wired to 245 (best match for modern UK), so the switch is now a dummy.

The overheating was caused by leaking reservoir caps which were replaced. Electrolytic caps have a lifetime of about 20 years so leaking caps are common in vintage amps. Faulty capacitors can lead to a much higher current draw through the transformer, overheating it, causing the issues we’re seeing. It also ties in with the internal HT being over 100V too low.
Vintage Ac30 Mains transformer temperature rise
I noticed that the tremelo mode switch had come loose and the resistor wires have sheared at the body of the device. They were replaced using vintage style carbon composition resistors for authenticity’s sake. (Do carbon composition resistors make a difference to tone? According to R.G Keen, The jury is still out!). If you have one of these vintage units, make sure that you keep the switch tight to avoid similar problems.

The amp didn’t run especially hot after the caps had been replaced. The output valves are all matched and measure sensibly, and the amp is cathode biased, so there’s little risk of the output stage being out of spec. I had another vintage AC30 repair in (a cream ’61 model), so I was able to make a proper comparison of the running temperature of the two amps. You can see how close they were in the graph above.

I’m pleased to say that the customer was very happy with the vintage AC30 repair! If you have a Vintage vox, or any guitar amp in need of repair, please get in touch.

Mesa Boogie Bass amp Repair

Mesa Boogie Bass 400+ Repair

This mesa boogie bass amp repair had the highest power valve count I’ve seen. The amp uses no less than twelve 5881 6L6 valves!

Like the recent fender amp repair this valve amp was blowing fuses. Also like the fender repair, the failure was down to a damaged power tube. Two in fact.

Much is made of Mesa Boogie’s insistence upon the use of mesa branded valves on guitar forums and these guys come in for quite a lot of stick. You can read Randall Smith’s defence of the idea here. My opinion is that the principle is reasonable for the majority of non technical users.

In this case, the amp had been fitted with Sovtek valves. Aside from the two failures many of the valves no longer matched well.

By testing mesa boogie valves in my valve tester I know what non mesa valves are within mesa parameters for use in their amps. I could tell that 4 of the sovteks were out of spec, meaning that 6 of the 12 needed replacing. After completing this simple task the amp was fixed.

If you have a mesa boogie bass amp repair please contact me via the contact page.

Valve amp blowing fuses – Fender repair – pro reverb

Fender valve amp blowing fuses

A customer brought this fender repair to me with a common complaint. The valve amp was blowing a fuse every time the standby switch was turned on. A valve amp blowing fuses can be a number of things, but in this case I suspected that the amp probably had a faulty power valve.

This turned out to be true. One of the 6L6 valves had a fault that causes a high current to pass between anode and cathode causing the fuse to blow.

This can occur in all valve amps with all types of valve.  Elsewhere on this blog, there’s a Marshall valve amp blowing fuses that was down to a shorting EL34 valve. There’s also a more recent mesa boogie valve amp blowing fuses.

Once a power valve is replaced, it must be rebiased. I set this fender back to manufacturers spec. Matching power valves should always be used.

If you have a valve amp blowing fuses, please do Contact me for advice.

Ampeg Repair – SVT pro ii

Ampeg-repair-svt-ii-bass-amp

What a huge beast this Ampeg repair is! Weighing in at an incredibly heavy 32kg I wasn’t sure that my workbench would take the strain!

It’s an SVT ii powered by 6 KT88 output valves meaning two massive transformers, owner for three mains and one for the output stage. When both must be capable of 300W continuous, that’s a lot of iron!

The owner was finding that the amp would drop in volume after a few minutes of running. It’s a common problem that I was quickly able to trace back to an oxidation issue, meaning a nice low cost repair for the customer.

If you have an Ampeg repair that needs attention, please get in touch , but you’re carrying it in!

Presonus Repair – Monitor Station

presonus-repair-monitor-station

I don’t often get studio equipment on the bench, so this Presonus repair was a new one for me. The customer was finding that the unit buzzed uncontrollably on all outputs. Experience leads me to test the internal power supply when a noise problem appears all over the unit, in this case, my hunch was correct and the repair was finished in a couple of hours.

Update June 2023: After a few enquiries, I’ve made a DIY capacitor kit available, so you can fix your monitor station yourself. The product info is here.

If you have a Presonus repair that’s causing your home studio pain, get in touch!

Trace Elliot GP7SM Repair

Trace-Elliot-repair-AH350-GP7

A recent Trace Elliot GP7SM Repair, a amp service actually.

The owner brought the amp in for a check over before sale. This is a really beautiful Trace Elliot!

This particular AH350 (from the early 90s) uses the Trace MOSFET output stage, with Lateral type audio FETs. These are expensive, but worth it – the other Trace Elliot Bipolar output stage has some reliability issues that I’ve seen in the past.

This GP7SM was fine though. No problems.

It’s got a really cool optional UV light at the front. I haven’t seen one like this before. Makes the green front panel glow nicely. Great, if you like it!

Available to buy (as of Nov ’14). If you’re interested I’m obviously not going to publish customer’s details, but I can put you in touch.

Mesa Boogie Repair – Maverick (Dual Rectifier)

Mesa Boogie Repair - Dual Rectifier Maverick

This Mesa Boogie repair was one of the nicest amps to play, but one of the longest repairs of the year I’m afraid!

In this case, the Maverick had a problem with the channel switching. After a few minutes the rhythm channel would increase in volume, and the lead channel would bleed through an unpleasant fuzzy distortion. The fault was fixed by the opto-isolator replacement in the switching circuit.

It’s never a good thing to discover that your amp is faulty, but a broken amp is particularly bad news for owners of Mesa Boogie amplifiers. This is because Mesa Boogie construct their amplifiers in a way that lengthens the repair time.

The reason is that the amplifier is soldered into position on all four sides. Any changes to the board must be done after completely dismantling the amp (taking 30minutes each time). If several things are replaced in a more complex job, then the costs quickly mount up. Before I add to any myths, it’s NOT because the amplifier is PCB, it’s perfectly possible to make a PCB amp that’s easy to repair! It’s also possible to make a Point to Point amp that’s a nightmare to repair as well – I’ve seen them!

Anyway, what an absolutely great tone this Mesa Boogie has when it’s cranked. It’s completely unlike the rest of the Dual Rectifier series. The Black Widow speakers in this particular combo are brilliant speakers.

If you have a mesa boogie repair, please do get in touch and we’ll talk it through.

Guitar amp attenuators, Variable Voltage, Power Scaling

PowerAmp-Attenuation

Guitar amp attenuators

I’ve had a lot of questions recently along the very familiar theme of ‘How do I make my amp quieter (whilst still sounding like a bad-mother rock’n’roll star, of course)’.

It’s a problem that many face, so I’m throwing some notes together in one place. I’m fortunate that the guitar world is one where lots of people want to know more about how stuff works, so this is intended to be a guitarist’s geek free guide with no jargonese (I’ll put links to more in depth discussions). Stop me if I’m not making sense.

I’ll keep using ‘attenuation’, the engineering term for ‘making quieter’, as it’s a commonly used commercial product description. If you’re reading this page then I assume you have some idea what rock distortion is in the context of guitar amplification. It’s also fair to say that in most guitar amps, even the cleanest loud tones are in fact being distorted imperceptibly by the amp.

The aim of the an attenuator is to preserve the distortion of characteristic of the amp whilst not operating at ear bleeding levels. Put another way, we want to make the amp behave as if it is being played loudly, when it is really quiet!

It’s fair to say that all elements of a valve amp can be operated in distorting conditions. It’s useful to know where in your amp the attenuator is doing it’s job so you can see what parts of this wanted distortion are preserved by your chosen attenuator.

PreAmp-Attenuation

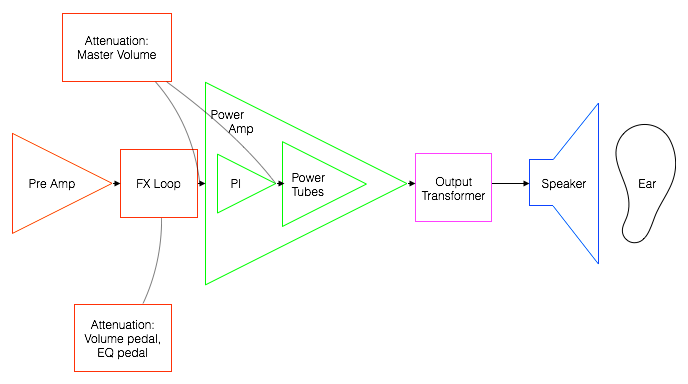
Preamp distortion with Master volume attenuator

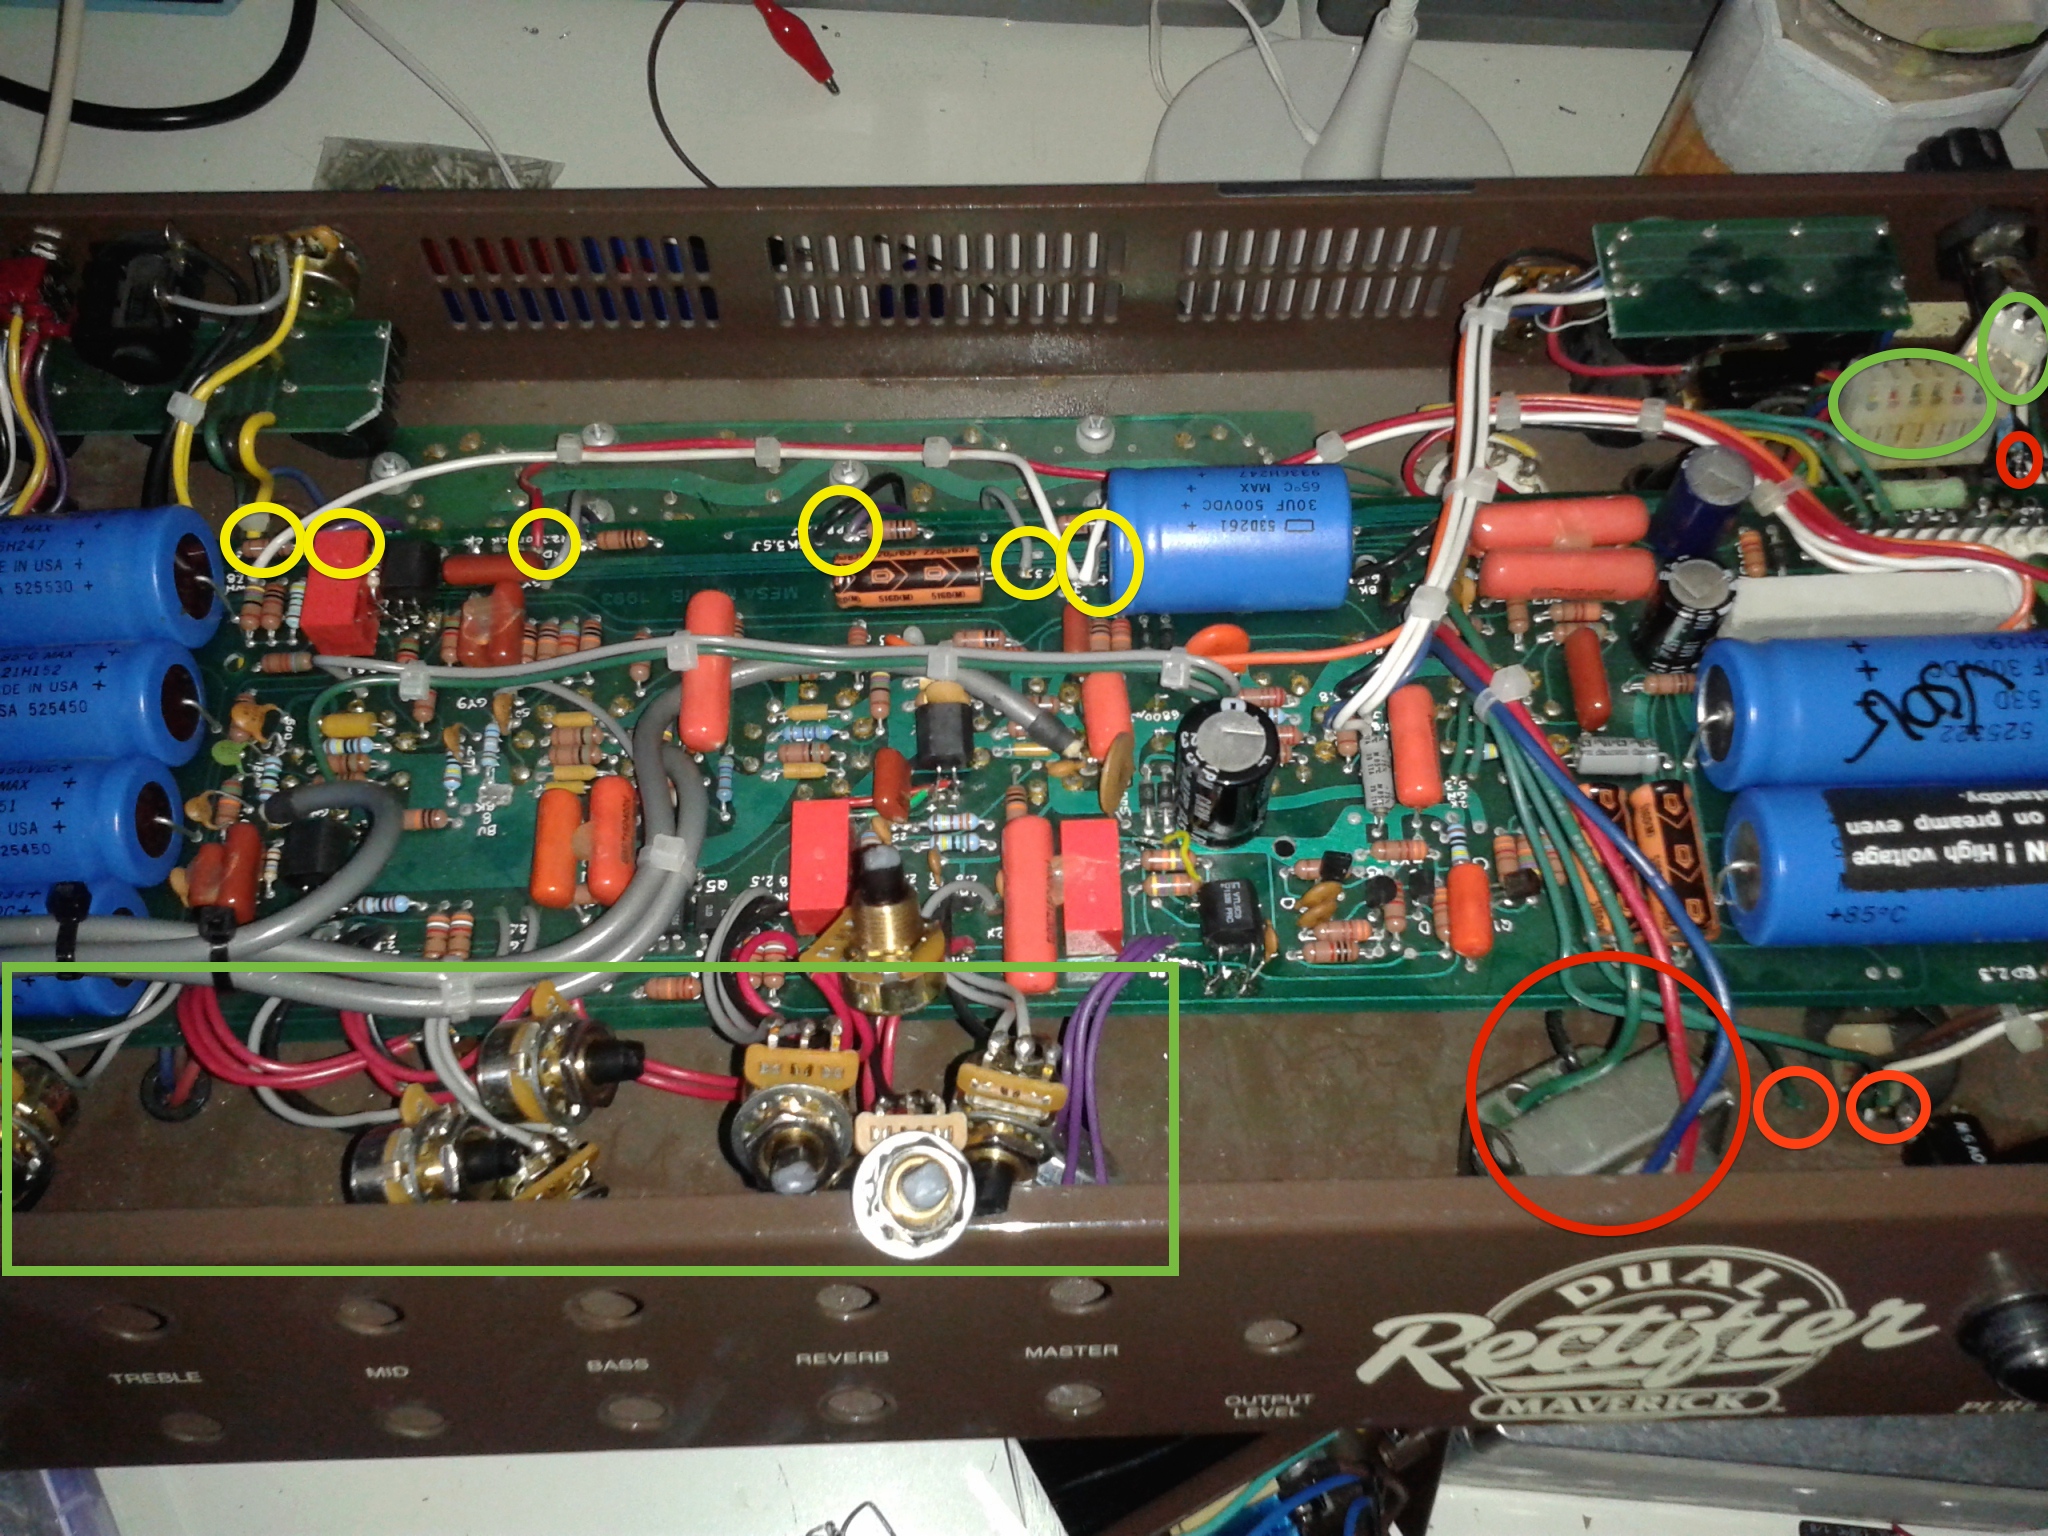
Many amps these days have a master volume. These attenuate the signals in the preamp, to allow preamp distortion at usable volumes. So the master volume style attenuator keep the preamp distortion when using a master volume. These are extremely useful for most styles of guitar and shouldn’t be underestimated. They’re the best kind of attenuator for a solid state amp, which doesn’t include any of the other distorting components listed below. This is the classic method that Marshall popularised with the JCM800/2203 etc. The same result can usually be obtained by placing a volume pedal in the FX loop of an amp or using a JHS ‘Black Box’ –  you can ever build one with a kit such as this. Some later designs (such as the Vox AC30CC ranges and some Trainwreck amps) have placed the Master volume after the PI (phase inverter) the valve that drives the power tubes, thus capturing the sound of this tube also.
PowerAmp-Attenuation

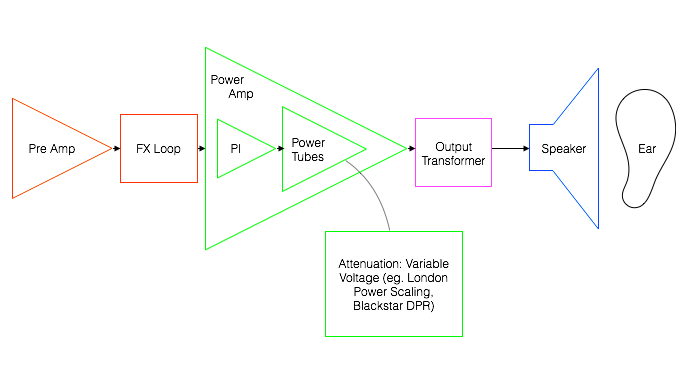
Power amp distortion with variable voltage attenuation

Keeping the explanation simple, this method involves starving the Power tubes in some way so that they ‘think’ that they are being operated at extremes. So you’re getting the preamp and the power amp distortion.
London Power and Hall amplification offer variable voltage solutions that cause the valves to distort at lower volumes, thus sounding like they’re being played loudly.

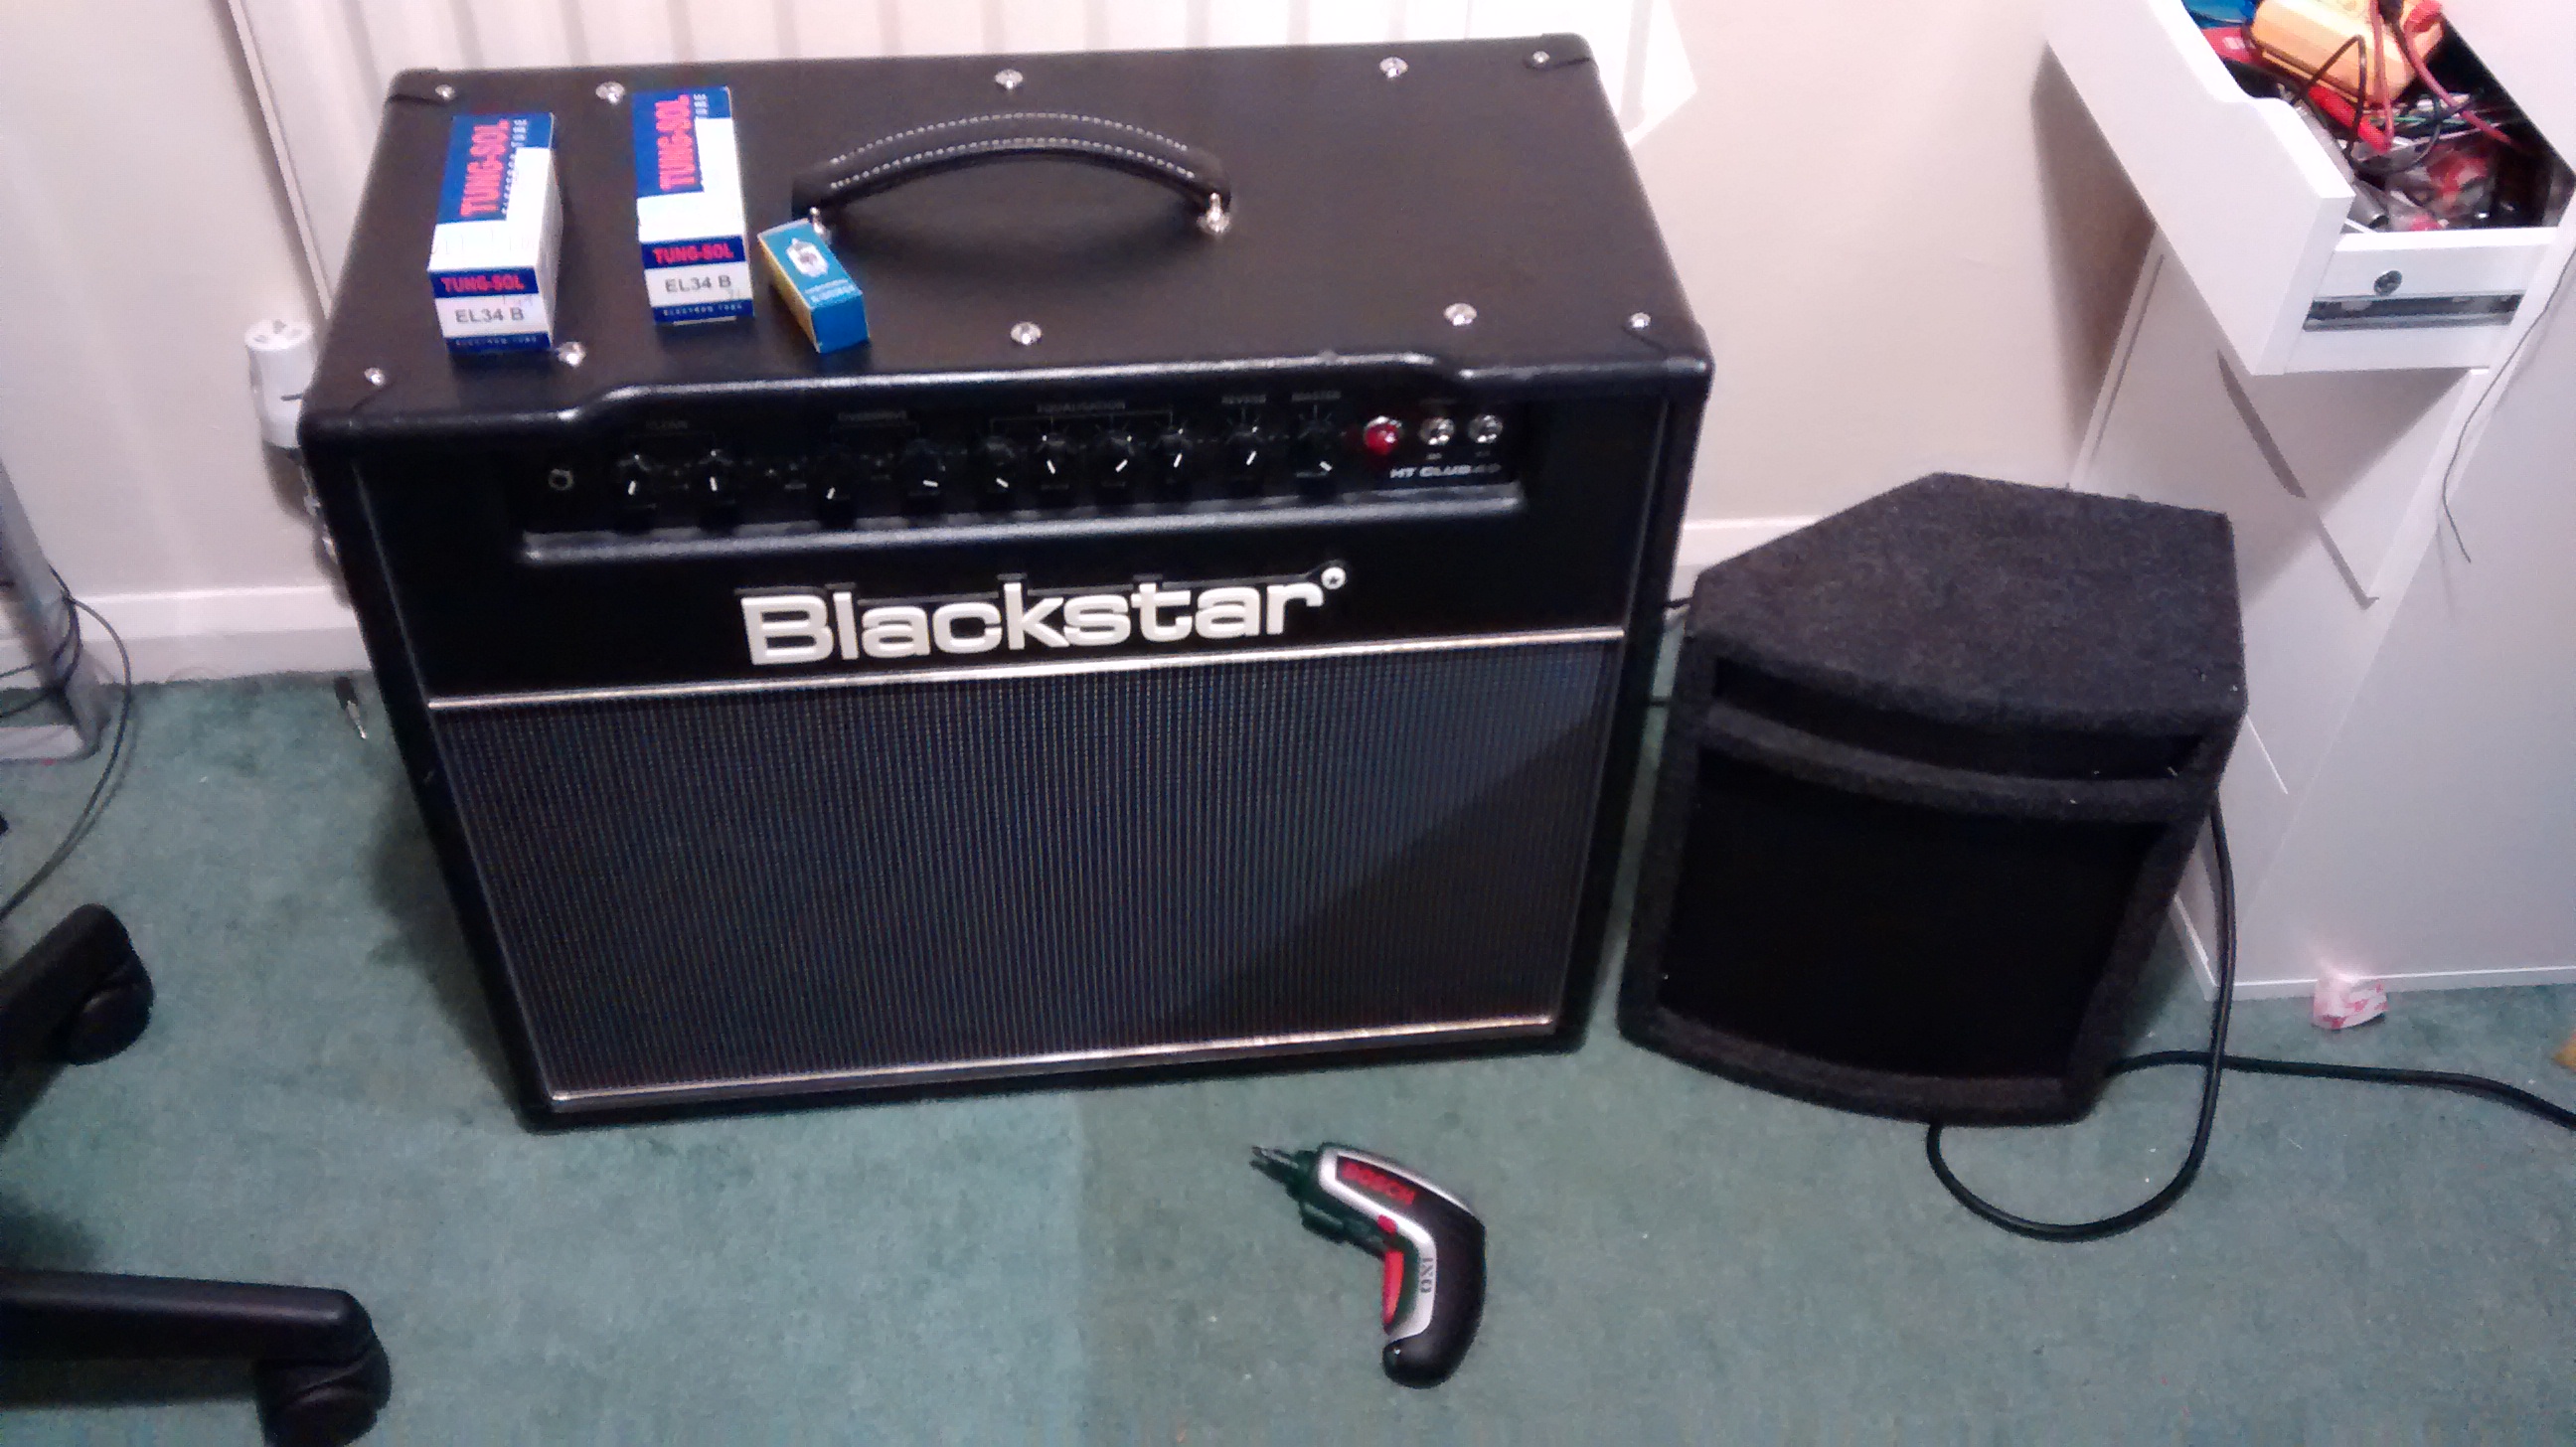
Blackstar’s DPR changes the current running through the valve by changing screen grid voltage. The DPR is a little cleverer than that, but discussion of how does lie outside the remit of this non-tech post, see their patent if you’re interested. Disadvantage: requires a mod/purchase of an amp with the technology.
OutputTransformer-Attenuation

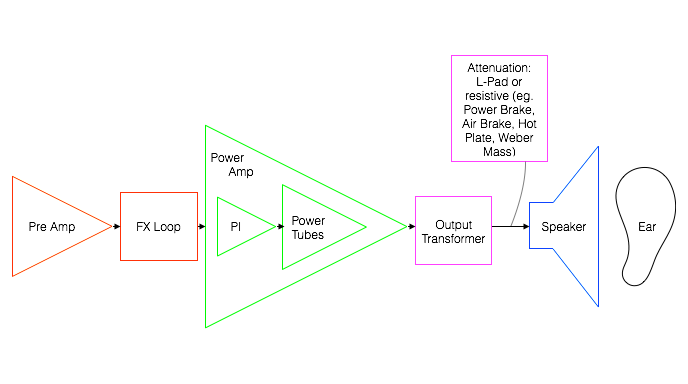
Output Tranformer distortion with ‘Guitar Amp Attenuators’ and Load boxes

Although all the above methods attenuate the output signal, the units most commonly referred to as amp attenuators are the brute force methods of attenuating. You do get to preserve the effects of preamp, power amp and output transformer distortion. These devices, such as the Marshall Powerbrake, THD Hotplate and Dr Z Airbrake, take the full power output of a loud valve amp and waste a big chunk of it as heat, allowing the speaker to only convert a small amount to sound. The Weber Mass Attenuator uses silent parts of a speaker to do the same job. Disadvantage: Substantial waste of power, same level of wear on amp components as if the amp had genuinely gone ‘to 11’.
Speaker-Attenuation

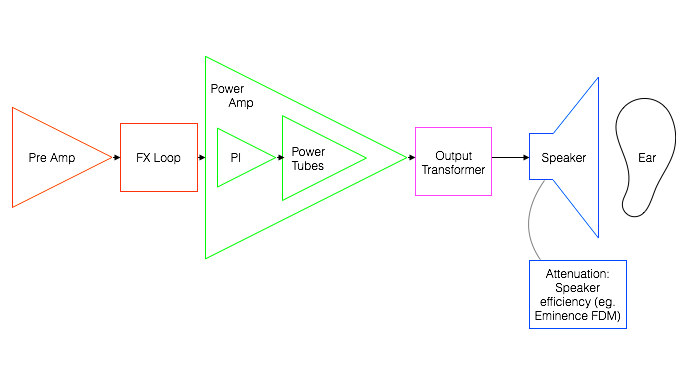
Speaker distorion using Speaker efficiency attenuators

First, you can also reduce the number of speakers in a big cabinet to reduce volume (you must keep the same speaker impedance – do some research). You can buy a speaker with a lower sensitivity (in dB/watt) for your amp to reduce the volume slightly. The only speaker I’m aware of that allows you to vary the efficiency is the Eminence FDM. This preserves the effects of preamp, power amp, output transformer and speakers all being run at full volume. The whole lot! Disadvantage: same as for the amp attenuators, also you don’t have free choice of speaker.

What do I recommend?

This is actually the question that I’m asked. I’ve tried all of them except the Eminence FDM speaker attenuators. If you’re looking at buying a valve amp, I recommend looking for one with a variable voltage type option. These will actually preserve amp component life and do a pretty darned good job of sounding the same as when cranked. I spend a good deal of time in ‘my other engineering life’ trying to reduce power wastage, so I don’t really like the idea of the brute force attenuator approaches, but if you’re looking to attenuate an amp that doesn’t have a voltage variation option they might be useful. If you’ve got a specific question, do drop me a line.

A lot of this depends on the style of amp and how it distorts. If you’re running a Fender amp, I think the FX loop kit or the JHS little black box do a more than adequate job. If you’re running a Vox, then this won’t do! The PI is too much a part of the distortion. You need either a PPIMV or a brute force attenuator.

The frustrating search for tone – is anything going to work completely?

I honestly don’t think so. The truth is that the only thing that sounds like a loud amp is indeed a loud amp. The response of our ears/brains (just ears for bassists(!)) to sound is not linear, meaning that our senses react differently to loud sounds and quiet sounds. It’s distortion of the ear and nervous system, if you like. So you can get the electrical path right, but you’re never going to get exactly the same response at the human brain. That said, some of the above will get you in a really good ballpark!

Finally…

Lastly let me say that all registered trademarks or trademarks are property of their respective owners, including, but not limited to Blackstar, DPR, Hot Plate, Weber, Weber Mass Power Brake, Air Brake, Eminence, DFM, Maverick, Marshall, AFD, London power, London Power scaling, JCM800… have I missed any?

Shure 545 (Harmonica) Harp mic volume control mod

Shure 545 Harmonica harp mic volume control mod

The Harp player from Whitefern Mountain String Band had previously asked me to repair a Carbon Copy pedal. He came back to me in February this year asking me to look at modifying a Shure 545 microphone to include a volume control.

The 545 is an SM57-like dynamic mic that’s popular with harp/harmoncia players. It’s quite common for harmonica players to be interested in volume controls actually mounted on their mics, and these are commonly found on green bullet style mics (I believe!).

Since I know little of the world of harmonica, I sought the advice of American harp mic guru Greg Heumann at BlowsMeAway. Since it wouldn’t be possible to fit the control inside a normal 545 enclosure, I purchased one of Greg’s sexy red enclosures to fit the volume control. Greg offers a choice of high and low impedance controls along with quality Neutrik XLR connector or a screw-type connector. I fitted an unbalanced XLR with pin2 hot to run into the customer’s Carbon Copy pedal. I thoroughly recommend Greg’s products, they’re of great quality and combine anorak level enthusiasm with great mech engineering!

The mod was a long drawn out process involving the delicate removal of the mic internals and the replacement of the transformer and volume control inside a smaller enclosure, specially balanced for harp players. It was fun to be doing something different.

In the mod you can see I’ve fitted Greg’s Bulletizer to the mic – the actual mic has a grille something like an SM57. Don’t have a clue how the bulletizer changes the harmonica sound, but it looks funky!

Greg does do the mod himself for USA customers, but if you don’t fancy sending your mic to the states, do get in touch.

Way to go Rowan. Its a great mic. I’m getting good feedback from other band members and audiences. The buletizer helps create a nice solid tone. It creates an extra acoustic chamber – my mouth being the other one. You did a nice job for me. feedback from customer on Facebook